 Kids Tag Art is the first lesson of the school year! This is a special project created by the Columbia County Tax Collector that helps to raise money for all public school elementary art programs in the county. Without this amazing program, there would be no art budget at Eastside! All grades from K-5th will be doing Tag Art this year! Students design a license plate tag and then it can be printed on a metal car tag, coffee mug, key chain, or Christmas ornament. Virtual learners will need to pick up the drawing template in the front office during the first week of school. The artwork cannot be done on any other paper and the template is only available at school in the front office. I recommend practicing drawing on a separate piece of paper first, because each child only gets one template. Order forms and more information on ordering will be available later. I will let you know as soon as I have the order forms. Orders will be delivered to school before Winter Break. On the Kids Tag Art paper, fill in the blank spaces at the bottom: School: Eastside Teacher: Columbia Homeroom Name: Student first and last name Kindergarten and First Grade: Create a Rainbow Materials: Pencil, markers and/ or colored pencils, and a black permanent marker *Do not write any words on your tag art design* 1. From the bottom left corner, draw an upside down U shape that touches the top of the paper and then goes down to the right corner. Trace with your finger first to practice. Parents, feel free to demo on a separate piece of paper, but please don't draw for them on their Tag Art paper. 2. Next, copy that shape again under the upside down U for the next color. 3. Do this again and again until you have six spaces to fill with color. 4. Carefully trace all of the lines with a permanent marker. Erase any extra lines. 5. Color the rainbow stripes in order from top to bottom. The rainbow is the same order as the color wheel. Red, orange, yellow, green, blue, purple. Which three colors are the primary colors? Which are the secondary colors? 6. Color the background however you want! Make sure to get all of the white spaces, unless you have clouds, of course. 2nd- 5th Grade: Design your own Tag! Materials: Pencil, eraser, black permanent marker, colored pencil *Do not write any words on your tag art design* 1. Your tag needs to have a main idea or subject that is BIG in the middle. Maybe your subject is a cat, a person, a car, or a dolphin. Be creative! Pick something you like to draw and that you want on a tag or coffee mug! Remember, do not draw anything from games, television shows, movies, etc. Someone else already owns those pictures and we can't use them on this project. The KTA and sponsor logos will go on the very bottom of the tag. Do not put the most important part of your artwork on the bottom line of the tag. Move it up about an inch and a half. Draw your subject with pencil. 2. Then, you need to design a background. Think of what is happening in your artwork. Pretend it is a like a story and start to add the details. Draw with pencil. You will need to trace everything with a marker later, so do not draw tiny tiny things. Remember, this artwork will go on a car later and no one will be able to see tiny drawings. 3. When your entire tag is filled, then you can trace all of your lines with a permanent marker. Do the eraser trick and see if you missed any! 4. Color with colored pencil. The best tags are bright and filled in with no white space. Be sure to press down hard and color slow and small. You need to color the very bottom where the logo will go, too. Maybe make it something like grass, water, or a road. 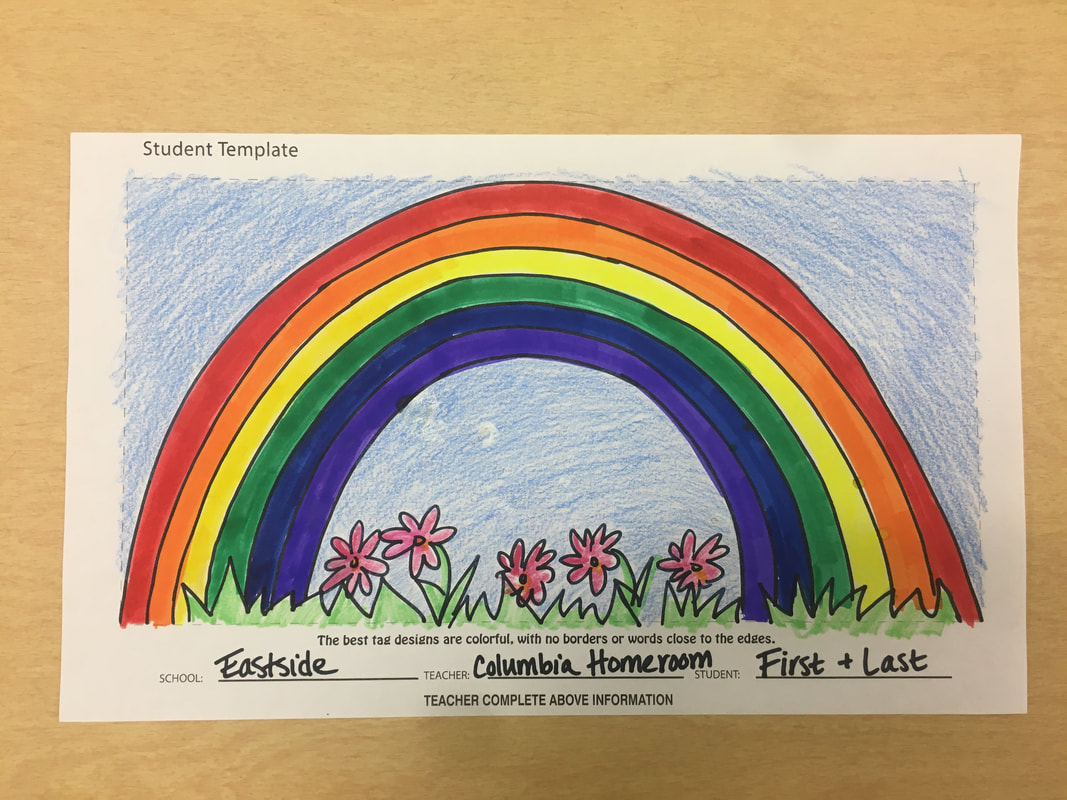 Example for K and 1st. Your artwork does not need to look exactly like mine. Be creative! 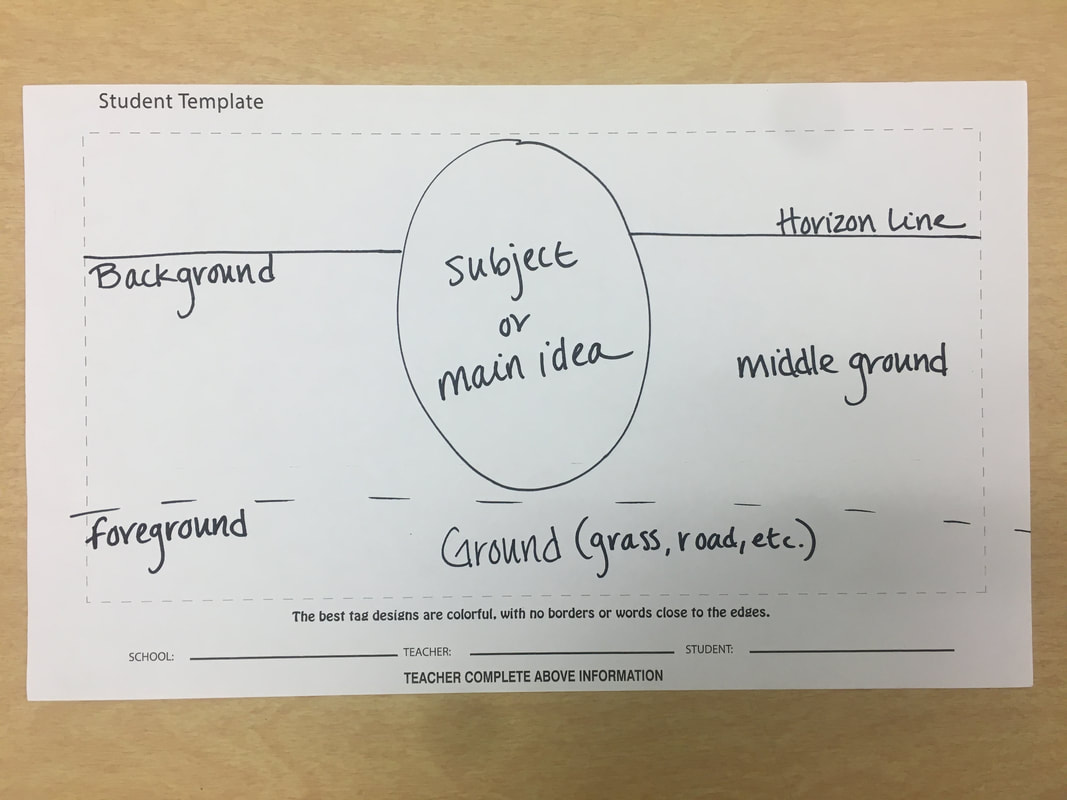 This is a general formula for the 2nd-5th grade Kids Tag Art lesson. Create a big main idea/ subject in the middle, then add the parts of a landscape. Foreground is in the front, middleground is in the middle, and background is in the back. The smallest things are in the background by the horizon line. That makes them look far away. The biggest things are in the foreground. That makes them look close up! Remember to keep important parts of your drawing off of the very bottom of the page. Do not write these words on your paper. This is just to help you get started. Comments are closed.
|
From Mrs. PinaireHello, Eastside artists! This is where you will find your weekly assignments while you are learning from home. Archives
December 2020
Categories |
 RSS Feed
